Step:1 Cache enable caching for mobile devices

Step: 2 File optimization:-


Step 5 Advanced rules


Step:6 Database No change in database.
Step:7 Heartbeat

Step 9 Tools no need to change
Step:1 Cache enable caching for mobile devices
Step:6 Database No change in database.
Step:7 Heartbeat
Step 9 Tools no need to change
Go to the Public Html folder:-
Step 1:- In the root folder wp-login.php Download the file then open it in any editor.
Step 2:- Find all wp-login and replace them with your custom URL name ( in my case its wp-news)

Step 3:- Upload your new login file ( wp-news.php)
Go to functions.php and paste the below code. (In my case I have to change the wp-login.php to wp-news.php)
add_filter( 'login_url', 'custom_login_url', PHP_INT_MAX );
function custom_login_url( $login_url ) {
$login_url = site_url( 'wp-news.php', 'login' );
return $login_url;
}
add_filter( 'logout_url', 'custom_logout_url', PHP_INT_MAX );
function custom_logout_url( $logout_url ) {
$logout_url = site_url( 'wp-news.php', 'logout' );
return $logout_url;
}
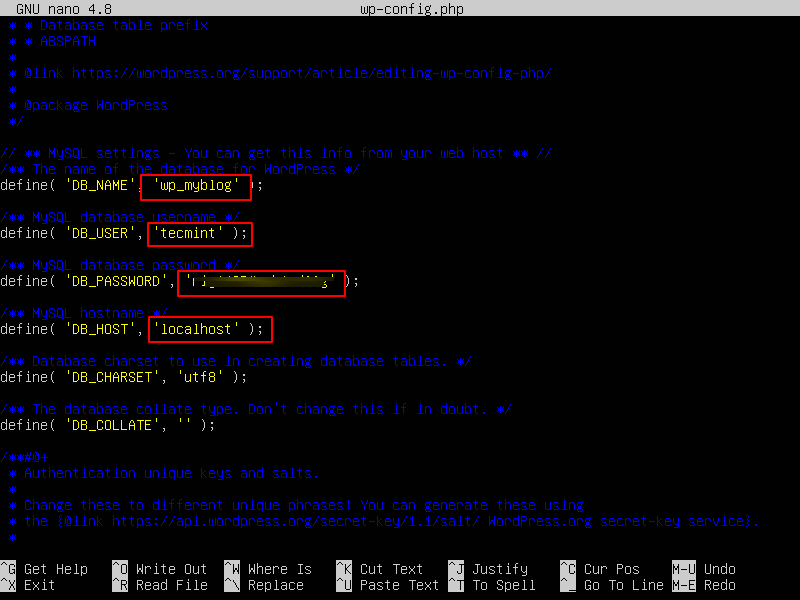
Go the /var/www/html/ directory and rename existing wp-config-sample.php to wp-config.php. Also, make sure to remove the default Apache index page.
After that you need to enter your db name , user name , password
Afterward, restart the web server and mysql service using the commands below:
Then open a browser and hit your server name or ip address.
Connect server to using winscp or Fttp .
Below are the file path:-
Folder path:- /var/lib/mysql
Then check their is files binlog.00234 etc.
After that delete all the file.
For deleting Mysql command.
Connect server to using winscp or Fttp .
Step:- 2 mysql;Step:- 3 SHOW BINARY LOGS;Step:- 4 PURGE BINARY LOGS BEFORE '2023-04-03 23:59:59'; (Choose your date )
RewriteEngine On
RewriteBase /
# Start rewrite uppercase URLs to all lowercase
RewriteRule [A-Z] – [E=HASCAPS:TRUE,S=1]
RewriteRule ![A-Z] – [S=28]
RewriteRule ^([^A]*)A(.*)$ $1a$2
RewriteRule ^([^B]*)B(.*)$ $1b$2
RewriteRule ^([^C]*)C(.*)$ $1c$2
RewriteRule ^([^D]*)D(.*)$ $1d$2
RewriteRule ^([^E]*)E(.*)$ $1e$2
RewriteRule ^([^F]*)F(.*)$ $1f$2
RewriteRule ^([^G]*)G(.*)$ $1g$2
RewriteRule ^([^H]*)H(.*)$ $1h$2
RewriteRule ^([^I]*)I(.*)$ $1i$2
RewriteRule ^([^J]*)J(.*)$ $1j$2
RewriteRule ^([^K]*)K(.*)$ $1k$2
RewriteRule ^([^L]*)L(.*)$ $1l$2
RewriteRule ^([^M]*)M(.*)$ $1m$2
RewriteRule ^([^N]*)N(.*)$ $1n$2
RewriteRule ^([^O]*)O(.*)$ $1o$2
RewriteRule ^([^P]*)P(.*)$ $1p$2
RewriteRule ^([^Q]*)Q(.*)$ $1q$2
RewriteRule ^([^R]*)R(.*)$ $1r$2
RewriteRule ^([^S]*)S(.*)$ $1s$2
RewriteRule ^([^T]*)T(.*)$ $1t$2
RewriteRule ^([^U]*)U(.*)$ $1u$2
RewriteRule ^([^V]*)V(.*)$ $1v$2
RewriteRule ^([^W]*)W(.*)$ $1w$2
RewriteRule ^([^X]*)X(.*)$ $1x$2
RewriteRule ^([^Y]*)Y(.*)$ $1y$2
RewriteRule ^([^Z]*)Z(.*)$ $1z$2
RewriteRule [A-Z] – [N]
RewriteCond %{ENV:HASCAPS} TRUE
RewriteRule ^/?(.*) /$1 [R=301,L]
# End rewrite uppercase URLs to all lowercase
Open console cloud and go to vm instances click on ssh and follow the below command :-
1) wget https://dl.eff.org/certbot-auto && chmod a+x certbot-auto
2) ./certbot-auto certonly --webroot -w /opt/bitnami/apps/wordpress/htdocs/ -d example.com -d www.example.com (change example to your website name)
3) ./certbot-auto renew --dry-run
4) sudo crontab -e /*( check the below code available or not :
0 0 * * * ./certbot-auto renew --quiet --no-self-upgrade ( check the this line of code is available
0 12 * * * ./certbot-auto renew --quiet --no-self-upgrade ( or not using
down arrow key then press ctrl+x then press y hit enter)*/
5) sudo nano /opt/bitnami/apache2/conf/bitnami/bitnami.conf /*(check the config using down arrow key and check below config
( ServerName www.example.com
( ServerAlias example.com
( Redirect permanent / https://www.example.com/
( Then press ctrl+x then press y hit enter to save your file)*/
6)sudo nano /opt/bitnami/apps/wordpress/htdocs/wp-config.php /* ( Then check below config :-
( define('WP_HOME','https://www.example.com');
( define('WP_SITEURL','https://www.example.com'
then press ctrl+x then press y hit enter to save your file);*/
7) sudo /opt/bitnami/ctlscript.sh restart apache
Note: You can also skip the 5 and 6 points.
First go to droplet commond line login your droplet after that
1) mkdir var
2) cd var
3) mkdir www
4) cd www
5) wget http://wordpress.org/latest.tar.gz (# install wordpress in directory for zip file)
6) tar -xzvf latest.tar.gz (#extract zip )
7) rm latest.tra.gz (#Delete file)
8)rm -Rf html (# Delet file)
9) mv wordpress html (# rename the directory)
10)apt install mysql-client-core-5.7
Step:1 Cache enable caching for mobile devices Step: 2 File optimization:- Step:3 Media Step: 4 Preload Step 5 A...


